Eyeshadow Palette Haul | MUA LUXE London Palettes

border

Everyone loves a good haul and when the products are affordable, the more you can buy 😉 win win!!

I mentioned in a previous post that I have been finding it hard to find something that catches my eye, especially with eyeshadows. All the colours that are being released at the moment are so similar and unoriginal, its getting a little boring. I haven’t seen anything that really grabs my attention where I ‘have to buy’ it! This is where MUA steps in. Now, I don’t believe that these palettes are new but they are different from anything I own! Looking at the colours in the palettes, they appear so vivid and creamy! I wasn’t disappointed upon swatching either. They are velvety to the touch and the colour pay off is insane! Very shortly I will be posting a make up look using one of these palettes, and will continue to play around with both palettes over the coming weeks.

mua logo

MUA is always bringing new and exciting products to the table and they have now launched the ‘Luxe’ range which offers a range from lipsticks to bronzers and nail varnish all at affordable prices. Go and check out their website > here.

border

I purchased two of their Luxe metallic palettes in, ‘Transcendent’ and ‘Mysterial’.

Transcendent holds three colours, silver, midnight grey and a dark blue/black with a smoothing eye primer too! Now, I understand, that sometimes the primer actually adds an extra cost that you would rather be spent on another colour. However, its then perfect for travelling and on the go instances. This palette would create the most beautiful classic smoky eye.

IMG_1326

border

Mysterial is like transcendent in sense that it holds three colours and a primer. The three colours are a goldy/copper, bright rich pink and a dark purple/brown. Although the colours seem a little extravigent and out there, they will create really dramatic unusual eye looks.

IMG_1324

border

IMG_1330

(Left: Mysterial colours | Right: Transcendent colours)

BOTH PALETTE’S ARE CURRENTLY £3 (INSTEAD OF £4) ON THEIR WEBSITE!!

DISCLAIMER: I purchased these palettes with my own money, I am not being paid to write this post. I am also not receiving any money for any palette’s purchase through the links provided.

Twitter: @harrietbeautyb1
Instagram: HarrietLester
Email: Harrietlester@hotmail.co.uk

Have you tried these palette’s? Do you like the look of them?

What look would you create if you had these palettes?

XXXX

February Favourites!!

I’ve been terrible with my lack of blog posts lately, but I will try my hardest to get a post up every other day. I thought I would post today about my February favourites, better late than never 😉

Now ladies, I know that in January you have probably been working your butts off to achieve your new years resolutions but lets face it, they’ve probably slipped in February. Well, I say, lets do something about it! Try as hard as you can to make sure that you strive to achieve your goals you set yourself, no matter what time of the year it is.

march

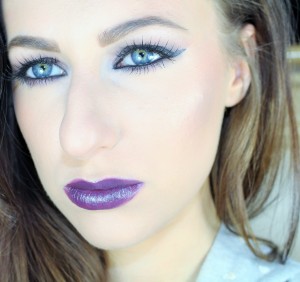
February has seen a lot of changes at work, I am now client facing full time and therefore I need to look more ‘polished’ so it appears that I know what I am doing… haha!  Instead of just slapping on some foundation and a little mascara, I have been making more of an effort with my appearance and adding a smoky eye to the mix every now and again. So with this, I have been reaching into the back of my beauty collection and re-fallen in love with some oldies!

eyes

Lets start with the window to your soul (or something like that)… the eyes! I am going to be honest (and a little big headed), I really like my eyes, not necessarily the shape but the colour. They’re bright blue and probably my favourite feature, so I do anything I can to enhance these bad boys. Combine this with my obsession with eyeshadows and palettes, I went a little crazy this month and have three palettes that are my favourite!! Yes, I chose three!

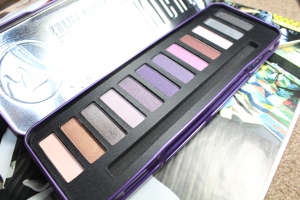
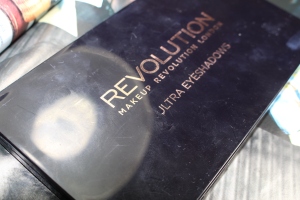
Make Up Revolutions – Naked Underneath

I’ll be honest (like I was in my review) I don’t like the packaging, its just not me and the style I strive for. I like simple, classic looks that scream sophistication. This for me, doesn’t do that! Luckily I like what’s underneath (wheyyyy ;)) It holds 16 shadows, a mix of matte and shimmer so its a perfect palette to create a wealth of looks. They are more warmed toned colours, but there are a few cooler ones too! Now, I am always on the look out for transitional colours, and boy does this palette deliver! ‘Attention’ (cool toned) and ‘Seeking’ (warm toned) are two of the most beautiful transitional shades I have ever seen. If you’re not sure what a transitional colour is, its the colour which is mostly applied to the crease and above that eliminates harsh lines from darker colours. When you’ve mastered blending, you can concur the world! I have already created a post using this palette, please go and check it out > here.

IMG_1004

IMG_1280

IMG_1281

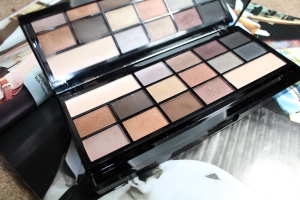
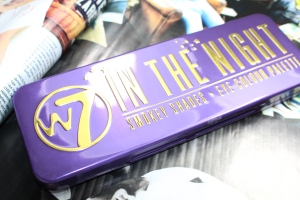
W7 In the Night Smokey Shades Palette

W7 is one of those brands that doesn’t get enough credit. It has fantastic products, for amazing prices that doesn’t compromise on quality. I love W7 and have done for many years now, which is why I never shy away from buying any of their new products. This palette has really grabbed my heart because it holds colours that are different. I am really sick of seeing the same colours over and over again just repackaged and renamed. BORING. This palette doesn’t do that, its like W7 has just chucked 12 fantastic colours into one palette and I love it! Sure, you might struggle to just use this one palette to create an eye look but atleast you’ll be creating something different, something that stands out. I am all for nudes, but sometimes it’s nice to have a change and go for the more interesting colours. On application these shadows are really creamy and stay put!!!! Check out a full blog post on this palette > here.

IMG_1285

IMG_1284

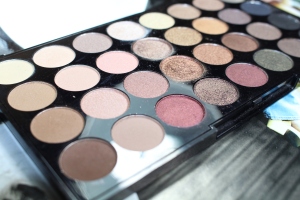
Makeup Revolution – Flawless Palette

One aspect I like for in a palette is compactness. I like a palette to be versatile, give variety and compact enough for me to travel with. The Flawless palette is quite possibly the perfect travel companion. This relatively small palette holds 32 shimmer and matte shades, so offers enormous variety. I would definitely say this a warm toned palette so if you prefer cooler toned shadows, this isn’t the palette for you. I cannot wait to do a look using ‘Black tie’- which I will be posting soon! Check out a full blog post > here.
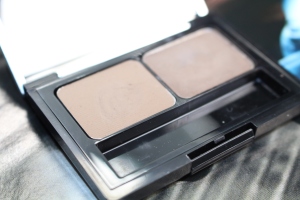
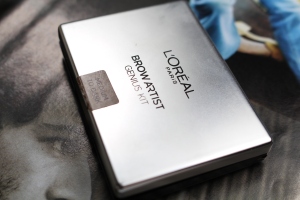
IMG_1263

IMG_1264

L’oreal Brow Artist 

Brows frame the face, right? I have always struggled with my brows, and they are definitely the step that takes the longest in my make up routine. But this brow palette has really impressed me. The powder takes little time and effort to apply and blend, whilst the wax holds my brows in place all day. My brows have this lovely little habit of doing as they please, and by the end of the day each hairs look like its had an argument with each other as they are all shooting off in different directions. This little palette is compact, holds the powder a wax and tools to apply the product (which I don’t use).

IMG_1265

IMG_1270

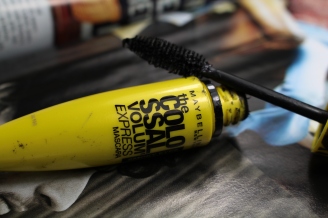
Maybelline The Colossal Volum’ Express Mascara

My eyelashes are horrendous to be frank! They are long but point in every which way direction they can, cannot hold a curl to save their life and generally just frustrate the hell out of me. I really struggle to find a mascara that actually works for me, but Maybelline The colossal does the trick. I won’t say that I am 100% happy with my eyelashes, but its the best I can get. Something about the wand makes my eyelashes actually go upwards instead of straight, which is always a bonus! I also don’t find that this mascara flakes off during the day leaving black dots under my eyes making me look a little strange. Win win!

IMG_1288

face

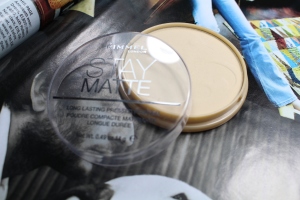
Rimmel Stay Matte Powder

I struggle with large pores and greasy skin, which gets too dry easily. So basically, in a nutshell I struggle with my skin! Its a careful balance between a grease ball and a dry, flaky mess! Every powder I have tried so far will always tip that balance either way, but step in Rimmel stay matte powder. Its pretty much a god send and my hero, it keeps me relatively shine free whilst letting my skin still look like skin. Its accessible, affordable and really works.

IMG_1271

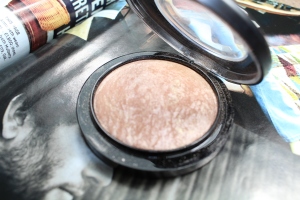
MAC Mineralise Skin finish in ‘Soft & Gentle’

Now I know you’ve heard of this highlighter, and I am sure you either love it or hate it. I personally love it, I know others find it too harsh and unflattering but it compliments my skin really nicely. You don’t want to go all liberal with this product, ‘a little dab will do’. Its one of the things I really like about this product, its pretty pricey so knowing that a little goes a long way is an added bonus!!
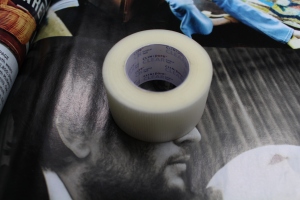
IMG_1276

Surgical Tape

It’s a pretty well known beauty trick, but it’s one that I don’t see a lot of people practice. Using a little bit of surgical tape under your eyes helps to create the most beautiful eye shadow looks. It prevents fallout, errors and allows you to create a perfect winged liner. I don’t apply eyeliner without using tape, I can’t create that sharp, clean look without it. I promise you that this trick really works, give it a go and let me know what you think.

IMG_1299

Have you tried any of these products? What do you think of them?

What are you february favourites?

XXXX

Add A Little Drama | Naked Underneath Palette

It’s no secret that I love Make Up Revolution, they’re ability to create such great quality products at such affordable prices leaves me confused as to why I even bother looking at high end brands. Lets be honest, they’re not perfect, they do have some products that I don’t personally like but about 95% of their products are fantastic. This is why I was really excited that they sent me one of their new palettes, ‘Naked Underneath’. I believe this palette has just been released just go check out their website here. DISCLAIMER: Yes, I’ll be honest, I was sent this palette to test and review for you guys. However I am NOT being paid for this review, nor will I receive money or discount if you purchase this product through any linked provided on this page. All opinions are my own! 

pack

Personally, I really dislike the packaging. I like clean, sleek and effortless looking packaging. The kind of packaging that can appeal to all ages, which this palette fails on. It’s such a shame, it is probably my personal opinion and lack of creativity that stops me from loving this but it just doesn’t scream ‘classy’ to me. The furry quilt across the top would have been better suited without the silver heart stuck on the top! What do you think?

IMG_1261

Inside the palette looks like Make Up Revolution’s usual packaging, clean and sleek. The colours are well placed, neat and it looks really expensive.

Opening the palette I was sooo excited, colours ‘Attention’ and ‘Seeking’ look quite possibly like the most beautiful transitional colours I have ever laid my eyes on. Wonderous looks perfect for highlighting the eye and could also be used on the face too! However, swatching these colours my heart dropped a little. The darker shades like ‘Darkness’ and ‘Hidden’ swatched patchy and with very little intensity. ‘Glory’ and ‘Love’ also swatched to a very similar colour. The colour pay off of these shades swatched quite badly, alas I decided to give the palette a go!

swatches

IMG_1257 IMG_1253 IMG_1258

the look

I wanted to give this palette the benefit of the doubt, it already lost points on the packaging and swatches but I was sure with a little perseverance it could create some beautiful looks.  Lately I have been creating a lot of neutral ‘work appropriate’ looks so thought ‘to hell with it’ and went all out. Fake eyelashes and everything! I was really intrigued by ‘Meow’ and really wanted to use the shade ‘Attention’ so create a look with these two. After applying my usual Urban Decay primer potion I then started to pat ‘Meow’ on my lid with a flat shader brush. To my surprise, the colour pay off was amazing. I didn’t even have to use a fix plus, it applied intensely by itself.  There was a little fall out with this shade, but that is to be expected with a darker colour. My advice is to use tape, and create your eyeshadow look before you apply your face makeup. After I had built enough intensity, I then used a medium sized fluffy brush, dipped into ‘Attention’ and swept this across the crease whilst blending with ‘Meow’ to make sure there were no harsh lines. In order to create the beautiful gradual transition from darker to lighter shade, work with the two step process. It can be quite a tiring process, but by applying the darker shade and then blending with lighter back and forwards will eventually reveal and beautiful blended look without those harsh lines.

To give a little more intensity and really build on that smoky look, I used ‘Darkness’ in the outer V. Now this colour was a little harder to work with, it took a little more patience and a lot more fall out but eventually I got the desired effect. To finish, I heavily lined my eyes, smudged it out and popped on some fake eyelashes.

Overall, I would recommend the palette based on the colours I have used for this look. It has taught me that the swatches don’t always reflect how the colours will apply on the lid.

IMG_1000

IMG_0905

IMG_1072

IMG_1069

Have you tried this palette? What do you think of this look?

Do you think you would try this palette? Are you a fan of the packaging?

XXXX

Green Stars | Revolution ‘Flawless’ Palette

green stars

In one of my very early posts I talked about the wonders that is Makeup Revolution and specifically their ‘Flawless’ Palette. This palette is what I’d call a perfect all rounder. It has the matte neutral shades, which are great transitional colour or look amazing on their own for that sleek neutral eye. However, Make Up Revolution has also included shades that will create that show stopper! I won’t speak for too long about this palette because I already reviewed it here. I have mentioned SO MANY times before (you’re probably getting a little bored of me saying it) but I am saving for a mortgage and therefore I am trying to practise ‘beauty on a budget’, which this palette is perfect for. It’s got a large of selection, a mixture of matte and shimmer colours plus the packaging is super sleek, clean and great to travel with.

For a change, I decided to do a make up look on my eldest sister, Katie, as her face shape is completely different to mine. She has a flatter bridge, smaller nose and doesn’t have the heavy crease like I do. She also has green eyes, which I decided to enhance by choosing ‘Green Stars’ as the star of the show for this look.

the face

Very kindly Katie has allowed me to upload a before and after photo (…isn’t she kind)

IMG_1170

For Katie’s make up I wanted to keep the focus on her eyes, so went easy on the face products. Katie moisturised, primed (with W7 Magic Primer) and I gave her face a few sprits with Urban Decay B6 Spray. Using the RealTechniques expert face brush I stippled No7’s Beautifully Matte foundation all over her face. I then used Maybelline’s Instant Anti-Age The Eraser under eye concealer, which blends like a dream and I have re-fallen in love with this product, and set all this hard work with Rimmel’s Stay Matte powder. I added a little warmth to her face using a large fluffy brush dipped into HOOLA bronzer by Benefit. I used my current go-to blush of the moment, Make Up Revolutions blush in ‘Love’ which is a perfect nude colour to gives just a subtle flush to the skin. Katie doesn’t normally fill in her brows, so I added a little definition with L’oreal’s brow artist palette in ‘Medium to Dark, and followed her natural brow shape.


IMG_1211

the eyes

Now, the star of the show.. the eyes. Katie has the most beautiful green eyes and I wanted to enhance those by using Make Up Revolutions ‘Green Stars’ eye shadow and blend upwards into a more neutral look. After I applied Urban Decay’s ey shadow primer potion all over her lids, I then used a flat shader brush to heavily pack ‘Green Star’ all over her lid, keeping it below the crease. Using a clean, large fluffy brush I softened the edges to eliminate any harsh lines. Using a medium fluffy brush, I dipped into ‘Smudge’ (a medium brown) and continued to soften the edge of ‘Green Stars’ by sweeping it in small circular motions across the crease. I kept going with this two-step process until I was happy with the desired intensity. Remember, its always best to start off with just a little amount of product and add intensity as you go, it makes it easier to blend and you’re more like to make mistakes if you don’t. To add smokiness, I used a small fluffy brush and grabbed a little of ‘Pure Chocolate’ and focused this in the outer V which gave her the gorgeous smoky cat eye look. To finish off the look I lined her eyes with black liner from MAC and added lots of Benefit ‘They’re Real’ mascara. Top Tip: I used tape on Katie’s eyes (as I do for my own) to create the ultra sharp smoky cat eye look, it also stops fall out and errors.

IMG_1203
IMG_1214
IMG_1197

I really hope that you enjoyed this look and love this look as much as I do.

Visit Make Up Revolutions Website to check out their great products!!

Did you love this look? Do you like Make Up Revolutions Products? Have you got any palette recommendations?

Please let me know what you think below 🙂

XXXX